
Intro
Last week a friend shared a sample of a recent IcedID malware using an interesting Crypter and although there’s nothing new regarding the final payload (it’s just the classical IcedID Lite Loader) the analysis of the Crypter was funny, so I decided to take some time to reverse it and share my analysis notes here.
To be honest I’m not that familiar with crypters in general so I ended up doing the analysis not knowing if the crypter was known or not and after finishing the analysis I ended up noticing it’s actually a kind of variant of a Crypter named Snow. According to a very nice report from IBM, Snow is a new/active crypter that has been used by malwares like Pikabot, IcedID and Qakbot and that has some code overlap indicating this is a sucessor of the Hexa crypter.
Before we start, it’s worth to mention that I cleaned the code in IDA (at least a good part of it) so if you open this file in your IDA or whatever framework it might not match exactly what you’ll see here. I decided to use my clean version in the screenshots to make it easier to the reader to understand the explanation. Also, since the crypter stages contains a lot of junk code splitted in multiple branches I decided to rely on the decompiler most part of the time.
General execution flow
The analyzed malware is a 64 bits DLL file and it’s execution starts by calling an exported function named vcab (usually via the rundll32.exe binary). A parameter named /k is passed to the file as well as it’s value. In the analyzed sample the parameter value passed is the string zefirka748:
rundll32.exe mw.dll,vcab /k zefirka748
If we take a quick look at the file statically we can notice that there’s a lot of exports available other than this “vcab”:
 Malware export table
A simple Google search would tell us this seems to be some sort of Trojanized version of a library that implements the Theora video compression format. If we search for the “vcab” export in the library’s export list we find zero results and that kind of confirms to us that this export is in fact suspicious and that probably the whole malicious actions would start from there.
Once the export function is executed the malware executes multiple stages (basically shellcodes) and ends up loading and executing the final payload, which is the IcedID Lite Loader.
Stage 0 (vcab export)
Cmdline parameter checking
The first thing performed by this export function is check if the process cmdline has a parameter named /k and a value for it. At this point there’s no checks regarding the value passed and the content is just saved for further usage.
 Function responsible for getting the cmdline parameter.
Crypter configuration
The crypter reads and manipulates a lot of fields from what seems to be it’s configuration. These fields are splitted in multiple sections such as .text and /81 and contains information like encrypted shellcodes, export function names, shellcode sizes, and more.
In the analyzed sample, the configuration is present 0x16735 bytes after the base address of the malware DLL module. In order to read the configuration the malware gets the current module base address and adds the mentioned RVA to it.
The module base address is obtained by using the function responsible for getting the config offset as a base address and then searching backwards until it finds both the PE Signature and the “MZ” Signature:
 Get config offset function.
 Get module base function.
The mentioned config has something similar to the following format:
1
2
3
4
5
6
7
8
9
10
11
12
13
14
15
struct MAIN_CONFIG_INFO
{
  DWORD init_export_str_offset;
  DWORD stage2_offset;
  DWORD stage2_size;
  DWORD stage3_offset;
  DWORD stage3_size;
  DWORD stage1_offset;
  DWORD stage1_size;
  DWORD stage4_offset;
  DWORD stage4_size;
  DWORD main_payload_info_offset;
  DWORD main_payload_compressed_size;
  DWORD config_xor_key;
};
The “offset” word here is actually an RVA since those are added to the main module base address.
API function resolving
Once the necessary information is obtained 3 functions are resolved in runtime: VirtualAlloc, LoadLibraryA and VirtualProtect. Those functions are resolved via the classic API Hashing technique and the algorithm used is the well known Metasploit ROR13 algorithm. To make my life easier during static analysis I used the nice HashDB plugin from OALabs to recognize the function hashes used.
The API Hashing technique is basically the parsing of the Loaded Modules List from PEB as well as the Export Table from the target modules. Each export name entry would have it’s hash calculated using the hashing algorithm and the result is compared against the hashes specified by the malware. Once the desired hash is found the export address is returned.
Stage 2, 3 and 4 decryption
With the config in hands the next stages content (2, 3 and 4 specifically) is read and written to a memory location allocated using VirtualAlloc. A key is then read from the config (5c 3b 0c 00 in this case) and is used as a multibyte XOR key to “decrypt” (well, it’s just XORed) the mentioned stages:
 XOR key located in the malware config.
 Config parsing and next stages decryption.
The decrypted content will be saved and passed to the next stage further on.
Stage 1 decryption and call
The LoadLibraryA function is used to load a Windows DLL named dpx.dll. Once the base address of this DLL is obtained via the return value of LoadLibraryA it’s PE headers are parsed and it’s Export Directory obtained. It then gets the first exported function from the dpx.dll file (DpxCheckJobExists in this case):
 dpx.dll loading and export table parsing.
Considering the DLL is loaded in the same address space of the malware module it’s content can be easialy replaced and that’s exactly what the crypter does. The content of the Stage 1 that is present in the config is written into the DpxCheckJobExists function. By default this stage is “encrypted” (XOR again!). After it’s written to the mentioned function it’s decryted using a multibyte XOR calculation using the provided cmdline key as the XOR key.
The final step of the Stage 0 (vcab export) is call the DpxCheckJobExists function from the dpx.dll, passing 5 parameters to it:
- The malware DLL base address
- The address of the “init” string (obtained from the malware config)
- A struct containing information regarding the next stages
- A struct containing information regarding the main payload
- The XOR key used to decrypt the Stage 2, 3 and 4
 Stage 1 decryption and call.
Stage 1 (DpxCheckJobExists export)
This stage is the first “shellcode” involved in the chain. In order to analyze it (as well as the other shellcodes) I dumped it from the process memory using the crypter config fields as a reference (e.g. offset and size). Once it’s dumped we can pretty much load it in IDA and force the analysis. Since it’s a raw payload IDA will not load the Windows type libraries so we need to do it manually by going to View -> Open subviews -> Type Libraries (or simply Shift + F11). In the opened window we Right Click -> Load type library (or simply Ins) and add the library that better fits our needs. In general I would go with the mssdk64_win10 one.
The beginning of this stage involves a lot of manipulation of the information received via parameter of the DpxCheckJobExists function. Other than that, a kind of new structure is created and receives some new information. We’ll refer to this new structure as “final structure”:
 Example of the final struct manipulation.
The format of this “final structure” is something similar to the following:
1
2
3
4
5
6
7
8
9
10
11
12
struct FINAL_STRUCT_INFO
{
  char main_process_cmdline[2048];
  char init_export_str[56];
  LPVOID main_payload_addr;
  QWORD main_payload_size;
  QWORD config_xor_key;
  LPVOID stage4_shellcode_addr;
  QWORD stage4_shellcode_size;
  char main_payload_content[7853];
  char stage4_shellcode_content[3150];
};
Fixing the next Stages
Considering the next stages are shellcodes and would use some functions from the Windows API there’s only 2 ways to make those adresses available: either via runtime linking performed by the shellcode itself (e.g. the API hashing technique mentioned previously) or those function addresses needs to be written in the correct place inside the shellcodes by an external payload. The Crypter approach is exactly the second one.
It uses the same API Hashing function to resolve 6 functions and then performs a byte pattern search inside both the Stage 2 and 3 content in order to locate specific DWORDs to be replaced by the addresses of the resolved Windows functions. The list bellow shows each pattern searched and the API function used to replace it:
Stage 2:
- 0xA1A2A3A4A5: ZwCreateThreadEx
Stage 3:
- 0xA1A2A3A4A9: RtlAllocateHeap
- 0xA1A2A3A4A7: ReadProcessMemory
- 0xA1A2A3A4AA: NtClose
- 0xA1A2A3A4A6: LoadLibraryA
- 0xA1A2A3A4A8: VirtualProtect
- 0xA1A2A3A4A5: CreateThread
The x64dbg view bellow shows an example of the Stage 3 content before and after the patch:
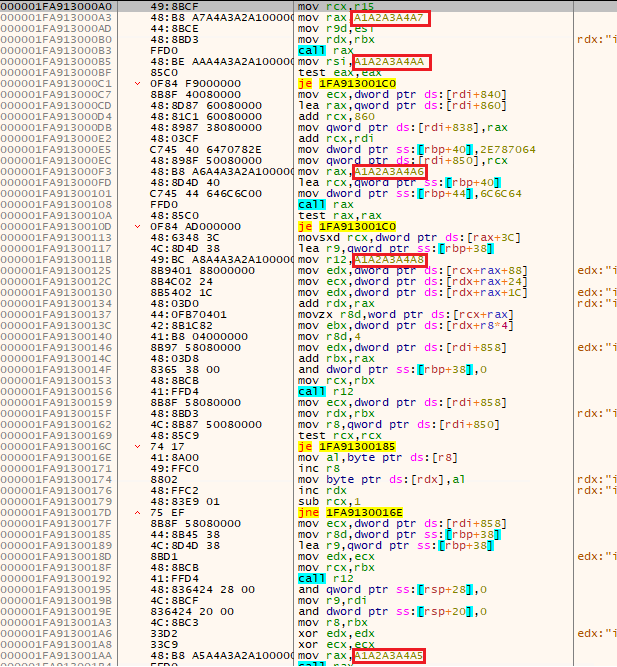 Stage 3 before the function patch
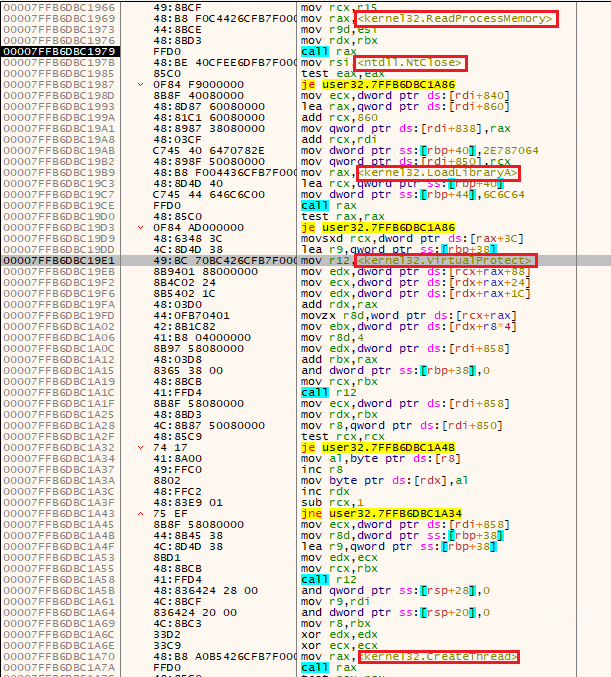 Stage 3 after the function patch.
Syscall stubs usage
At this point (specially in the injection part) most part of the API calls performed would not rely on the regular Windows DLLs and will use a crafted syscall stub array instead.
It first parses the ntdll exports and creates a kind of list of structs containing the addresses of the real syscall stubs, organized in an ascending order based on it’s SSN (System Service Number), followed by the hash of the syscall name (same ROR13 algorithm) and then the bytes (opcodes) responsible for performing the syscall instruction (let’s say custom stub).
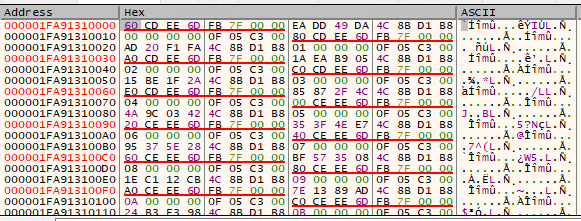 Syscall stubs.
We can imagine that each entry in this list has the following fields:
1
2
3
4
5
6
struct SYSCALL_STUBS_INFO
{
  QWORD syscall_stub_addr;
  DWORD syscall_hash;
  char stub_bytes[16];
};
The “stub_bytes” field represents the following assembly instructions (custom stub):
1
2
3
mov r10, rcx
mov, eax,<id>
ret
Once this list is created every time a function needs to be resolved it first sets the function arguments and then calls a function responsible for getting the proper custom stub. This function receives the base of the created stub list as well as the desired hash. The hash is then compared against each hash in the stub list and once it’s found the respective custom stub is returned:
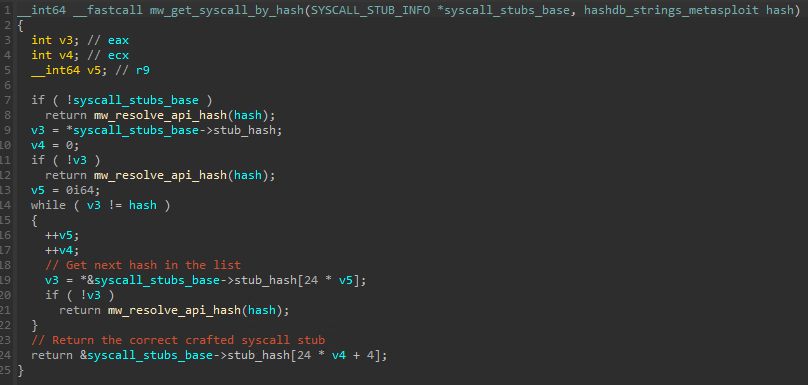 Syscall stub resolving.
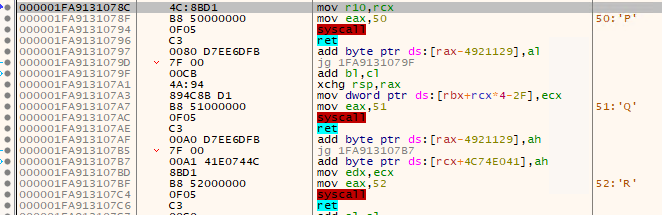 Syscall stub example.
The usage of this approach usually is to avoid usermode hooks performed by AV/EDR engines as well as make the RE process a bit more complicated since breakpoints in the regular API functions for example wouldn’t work as expected. I’ll not go into more details regarding this technique cause there’s a thousand of reports about it available already.
Process injection
At this point the preparation to inject into a target process begins and the “svchost.exe” process is the target of this crypter.
First, the crypter obtains information from all the processes using the NtQuerySystemInformation function passing the SystemProcessInformation parameter to it. By using this parameter a struct of type SYSTEM_PROCESS_INFORMATION is returned for each available process. The field ImageName of this structure is obtained, the same hash algorithm used before is applied to it and then it’s then compared against the expected “svchost” hash. If there’s a match the process PID is obtained:
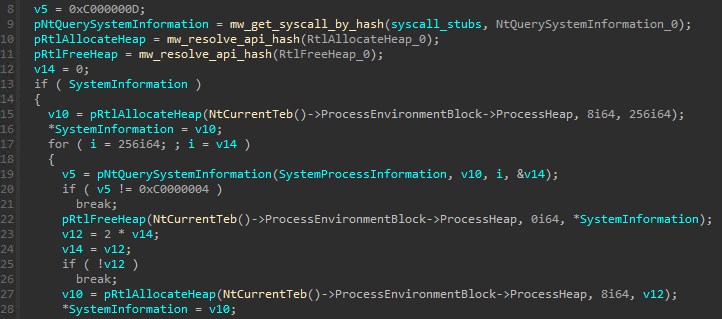 Get list of process information.
Since the next stages would be injected into svchost process the function responsible for the injection receives our “final structure” as a parameter. The injection function starts resolving multiple “custom syscall stubs” to be used:
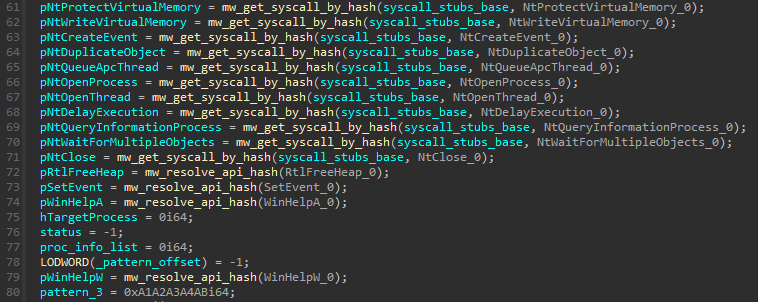 Injection stubs resolving.
A call to NtOpenProcess is performed to get a handle to the svchost process using the collected PID. All svchost threads are then enumerated and for each thread opened via NtOpenThread it creates an event using NtCreateEvent, duplicate it to the target process using NtDuplicateObject and then queues an user APC passing the NtSetEvent as the APC function and the created event handle as it’s parameter. Once all the threads had an APC queued it calls NtWaitForMultipleObjects passing a list of all event handles to it.
The injection approach used by this crypter is via a basic APC injection. APCs are basically a way to execute code in the context of a thread and whenever the kernel receives a request to queue an APC it first checks the mode (user or kernel) and then inserts the APC into the proper thread queue. In order to execute an user APC a thread needs to be in an alertable state and this is why the calls mentioned above are used.
These calls are a kind of preventive measure to make sure there’s a thread in svchost process in alertable state via the duplicated events being triggered:
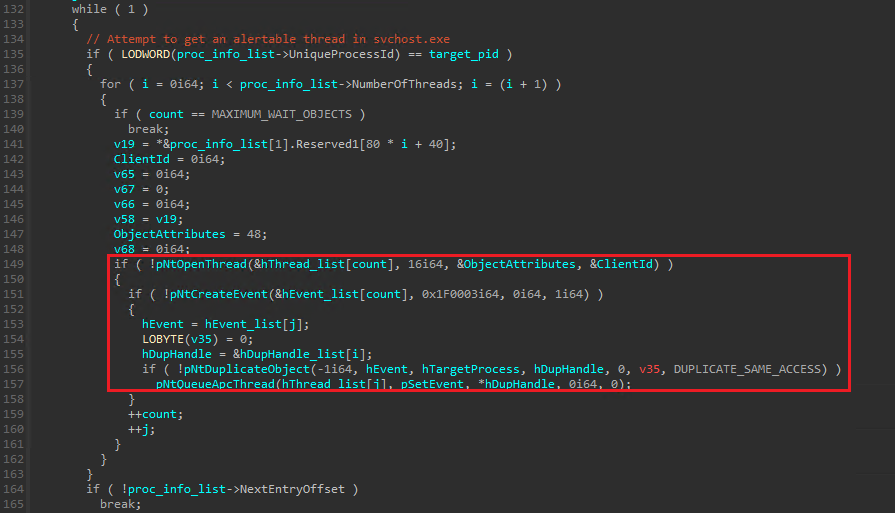 Queue an APC for each remote thread.
 Wait until an object is ready.
Once the proper thread is identified the function WinHelpW is overwritten with the Stage 2 content and the function WinHelpA with the Stage 3 content (both exported by user32.dll). For performance reasons once a DLL is mapped to a process memory Windows tries to maintain the same address for all the other processes and this is why use the addresses obtained from the main process (rundl32.exe) would match the addresses inside svchost.exe process (considering the user32.dll is already loaded, of course).
A new hex pattern (0xA1A2A3A4AB) is searched in the Stage 3 content and replaced by the main process handle and this handle is duplicated. This way the code injected in the target process would have access to the main process memory. The final step of Stage 1 is then call NtQueueApcThread function to queue the tampared WinHelpW function to the alertable thread, passing both the WinHelpA address and the “final struct” address in the main process to it:
 Write Stage 2 and 3 content and queue an APC.
Stage 2 (WinHelpW export)
This is the first function executed inside the “svchost.exe” process and it’s job is very straight forward: it creates a thread using ZwCreateThreadEx to call the tampered WinHelpA function (Stage 3) and passes the address of our “final structure” inside the main process (rundll32.exe) as the thread function parameter.
 WinHelpW call.
Stage 3 (WinHelpA export)
This stage is the one responsible for calling the final stage in this whole chain, which is the Snow Crypter loader (Stage 4). The first thing done here is get the content of the loader inside the “final structure”. It does so by using the address passed as the thread parameter and calling the ReadProcessMemory function to read the content from this address. The access to the main process is possible cause a handle to it was written to this stage by stage 1 already:
 Read the final structure from the main process memory.
The LoadLibraryA function is then called to load the dpx.dll module again, but now inside the “svchost.exe” process. The address of the DpxCheckJobExists function is resolved and replaced by the Stage 4 content (same approach applied by the Stage 0 payload). The screenshot bellow shows the DLL being loaded, the export being resolved and the Stage 4 content being written:
 DpxCheckJobExists export tampering.
The tampered function (Stage 4) is then called via a CreateThread call, passing the “final struct” (now accesible locally) as the thread parameter:
Stage 4 call via a new thread.
Stage 4 (DpxCheckJobExists export, again)
We finally reached the final stage! With access to the “final structure” this payload can read and decrypt the final payload. The algorithm used to “decrypt” it is again a multibyte XOR operation using the key read from the initial config and then subtracting the byte next to the XORed byte in the array.
The result content is not exactly a valid PE file, it’s more of a struct containing a compressed binary as well as some other information such as it’s size. This data is passed to a function in which seems to perform some sort of decompression and then it returns both the fully “unpacked” PE file as well as it’s size.
Regarding the decompression algorithm used, I’m assuming it’s QuickLZ due to what I saw in IBM’s report, but to be honest I know close to nothing about those type of algorithms so I’m just assuming it’s true:
 Final payload decryption and decompression.
 Decompression result.
 Decompression result.
The final step here is the old manual mapping technique. A region of memory is allocated and then the clean payload is mapped to it: it’s dependencies resolved via LoadLibrary + GetProcAddress, realocation applied and so on. The final payload is a DLL and has it’s DllMain function executed, followed by the previously mentioned init export function:
 Final payload map and execution.
Some reversing shortcuts:
In case you’re only interested in the final payload I have some shortcuts for you!
Considering the fact dpx.dll will be loaded at svchost.exe process and the execution will be transfered to the final IcedID payload at some point we can use tools like Process Explorer, System Informer or Process Hacker and search for any process that has the dpx.dll loaded. If it’s svchost.exe there’s a high chance this is our target. After it we would just need to find an allocated region inside it that contains a PE file and dump it:
 dpx.dll search in Process Hacker.
 Allocated memory search in Process Hacker.
The downside of this approach is that the file would be already mapped in memory so it would be aligned to a page boundary and we would need to fix it. A better approach is to try to find the real final payload before it’s mapped by the loader. Since that would be the raw binary it’s aligment will be all good and it will be way easier to manipulate.
As we saw the earlier, the decompression function receives the decrypted final payload and returns the uncompressed one as well as it’s size. If we perform a simple check in x64dbg hex dump we’ll see there’s 0x400 bytes (the headers) from the first byte of the file until the first byte of the .text section. Considering 0x400 is usually the value of the File Aligment field in the IMAGE_OPTIONAL_HEADER we can assume this is the final payload, clean and ready to be dumped!
 Alignment of the decompressed payload.
The only thing we need to do to dump it using x64dbg is select the 0x3400 bytes (unpacked payload size) in the hex dump -> Right Click -> Binary -> Save to File. And there we go! A clean payload to be analyzed. We can check it with DIE and see some of the known IcedID strings and names:
 General information.
 Payload imports.
 Some famous IcedID strings.
Conclusion
I hope you enjoyed the reading and if you have any feedback regarding this analysis I would love to know about it.
Happy reversing!